Lab 6: RFID Reader and Touch Sensor IoT
Date: July 13
Time: 1:00-5:00 PM
TA: Shanmu Wang
Hardware: SparkFun Simultaneous RFID Reader - M7E Hecto and passive UHF RFID tags
Code: RFID_Lab GitHub repository
Goals
By the end of this lab, each group should be able to:
- explain the roles of an RFID reader, antenna, passive tag, EPC, RSSI, and read count;
- use Universal Reader Assistant to read passive UHF RFID tags;
- export RFID readings through a TCP port and record them with Python;
- collect repeatable RFID logs under different distance, orientation, and blockage conditions;
- visualize RSSI distributions and read-count changes from RFID logs;
- build and evaluate a simple three-point RFID touch sensor;
- explain why distance, orientation, metal, water-rich objects, and body blockage can make RFID unreliable.
Team Setup
Form a group of 3 and enter your group information in the shared Google Sheet.
Each group should also create a shared Google Slides deck and paste the slide link into the same sheet. Use the slides to record screenshots, plots, photos of your setup, and short answers.
Important requirements:
- At least one group member needs a Windows laptop. Universal Reader Assistant will run on that laptop.
- Other group members may run the Python logging and plotting scripts from their own laptops after connecting to the Windows laptop hotspot.
- Each group will receive one SparkFun Simultaneous RFID Reader and three RFID tags.
Recommended roles:
| Role | Responsibility |
|---|---|
| Reader operator | Runs Universal Reader Assistant on the Windows laptop. |
| Python operator | Runs the TCP logging and plotting scripts. |
| Experiment lead | Places tags and keeps the reader/tag geometry consistent. |
| Scribe | Records EPC values, filenames, observations, plots, and slide notes. |
1:00-1:20 PM - Repository, Groups, and Hardware
Open VS Code and open your working folder, then open a terminal:
Ctrl + `
For code collaboration, follow the Git and GitHub collaboration guide before editing the lab files.
One group member should fork the instructor repository first:
https://github.com/wshanmu/RFID_Lab
Then that group member should add the other teammates as collaborators on the fork. Each group member should clone the group fork to their own laptop, not the instructor repository directly.
Replace GROUP_OWNER_USERNAME with the GitHub username of the teammate who created the fork:
git clone https://github.com/GROUP_OWNER_USERNAME/RFID_Lab.git
cd RFID_Lab
Then add the instructor repository as upstream so your group can receive updates:
git remote add upstream https://github.com/wshanmu/RFID_Lab.git
git remote -v
Activate the Conda environment from Lab 1 and install the plotting dependency:
conda activate cosmos-ds
python -m pip install -r requirements.txt
Inspect the files:
| File | Purpose |
|---|---|
URAx64.exe |
Windows installer for Universal Reader Assistant. |
reading_from_TCP.py |
Connects to the TCP export stream and saves RFID readings to a log file. |
plot_single_log.py |
Plots RSSI distribution and read count for selected EPCs in one log. |
plot_multiple_logs.py |
Compares several log files in one folder. |
touch_detector_gui.py |
Live three-tag touch detector using baseline RSSI and read rate. |
rfid_log_utils.py |
Parses RFID log lines and summarizes data by EPC. |
rfid_plot_style.py |
Shared plotting style for the lab figures. |
1:20-1:50 PM - Install Universal Reader Assistant and Read Tags
On the Windows laptop, install Universal Reader Assistant:
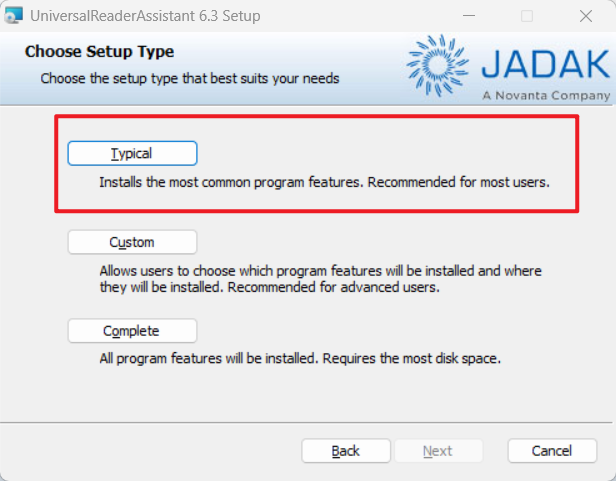
- Open the local
RFID_Labfolder. - Double-click
URAx64.exe. - Choose the Typical installation option.
- Launch Universal Reader Assistant after installation.
Connect the SparkFun RFID reader:
- Connect the reader to the Windows laptop with a USB data cable.
- Open Universal Reader Assistant.
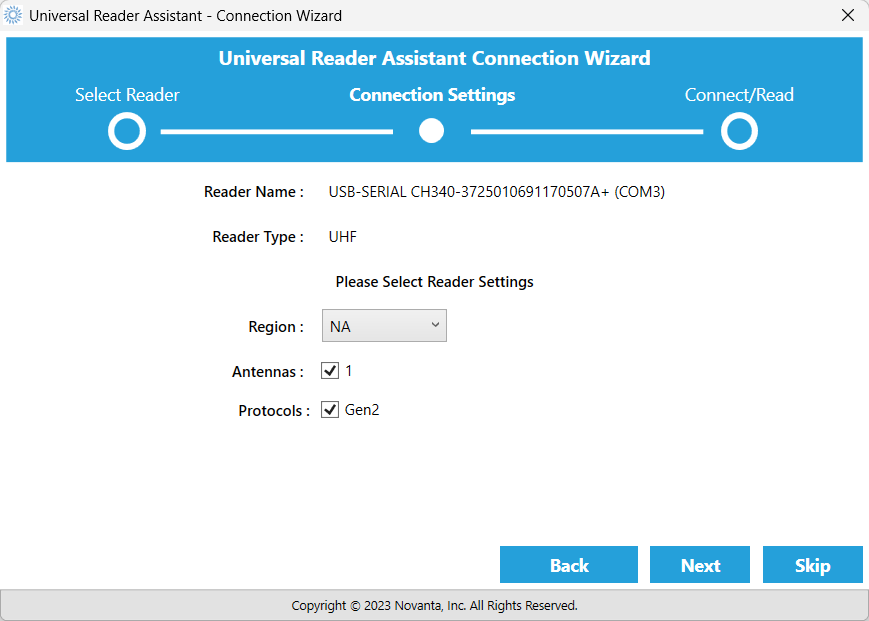
- Choose Serial Reader and select the connected reader/serial device.
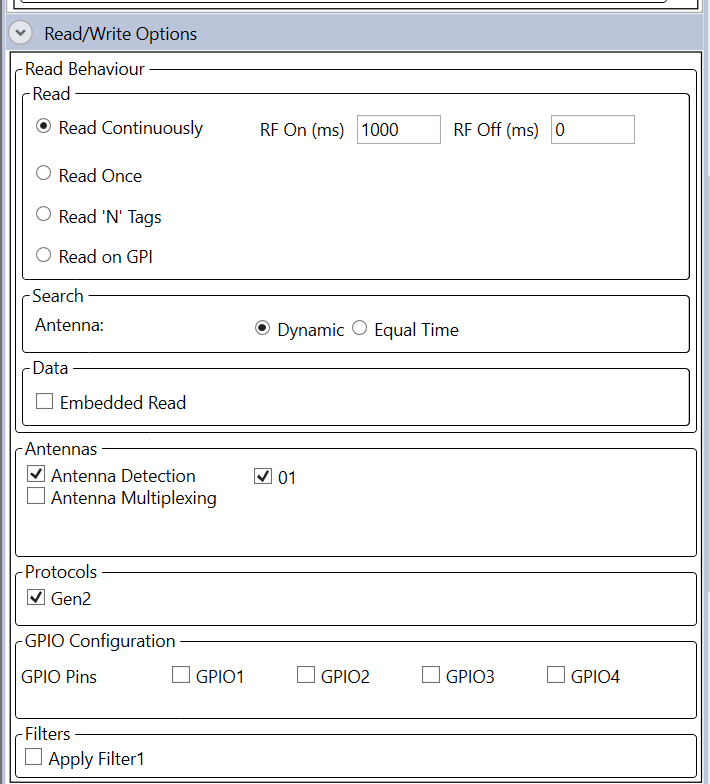
- Choose
NA(North America) as the region and click theAntennas, then clickConnect & Read - Place one RFID tag near the reader.
- Start reading and confirm that the tag EPC appears.
If you could not see the connected reader device, update the the CH340 Driver following the link: About Installing CH340 Driver
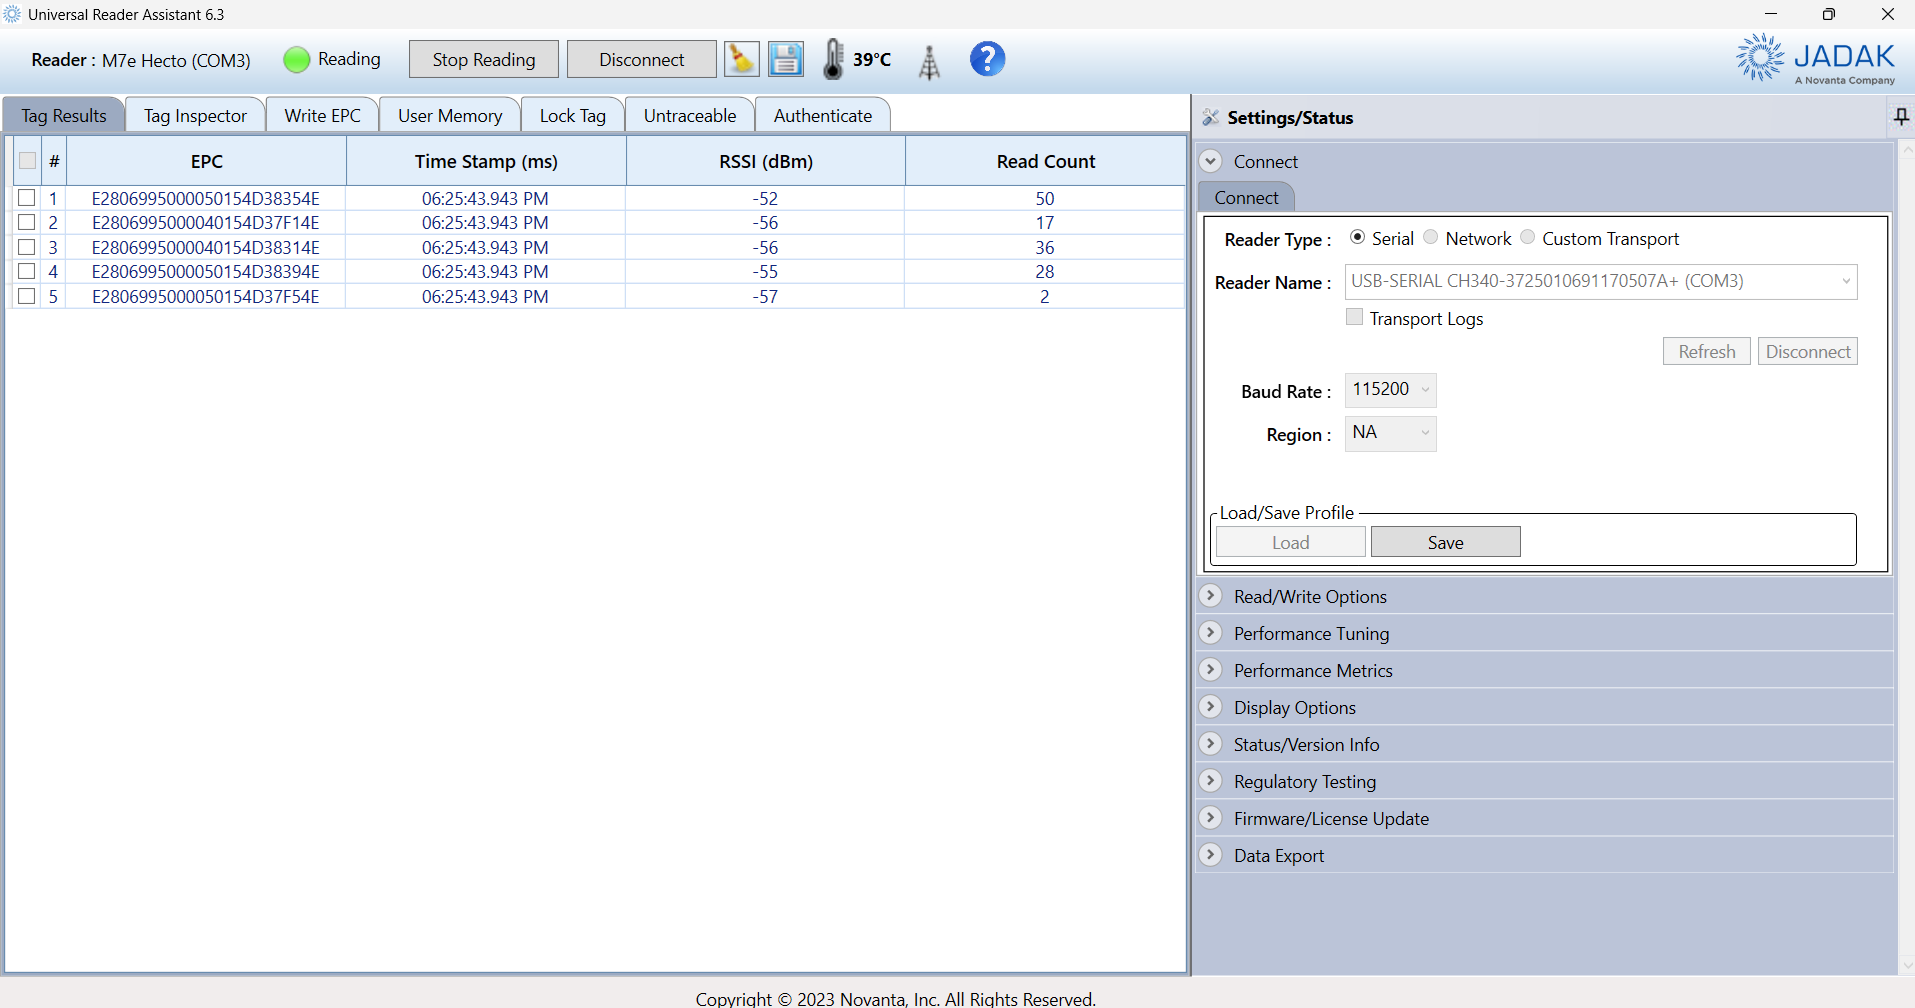
Record the EPC values for your three tags:
| Physical tag | EPC | Notes |
|---|---|---|
| Tag 1 | ||
| Tag 2 | ||
| Tag 3 |
Checkpoint: show the TA that Universal Reader Assistant can read at least one tag.
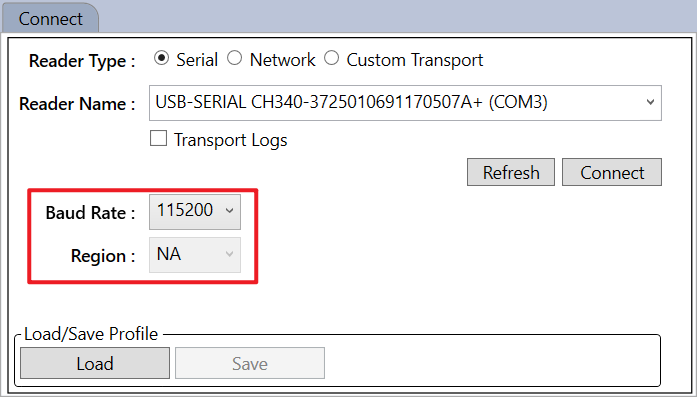
If you need to stop and reconnect the reader from the GUI:
- Choose a baudrate of 115200 and Region of NA
- Click the antenna selection
1:50-2:20 PM - Enable TCP Export and Run Python Logger
Universal Reader Assistant can display tag reads, but for analysis we need to save the stream to files. In this lab, Universal Reader Assistant will export readings through a TCP socket, and the Python scripts will connect to that socket.
A TCP connection lets one program send data to another program over an IP address and port. Here:
- Universal Reader Assistant acts like the TCP server.
reading_from_TCP.pyacts like the TCP client.- The default port is
9055. - If Python runs on the same Windows laptop, use host
127.0.0.1. - If Python runs on another group member’s laptop, use the Windows laptop’s hotspot IP address. This is often
192.168.137.1.
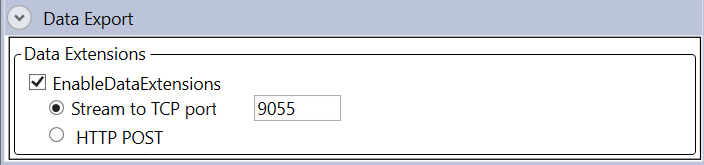
In Universal Reader Assistant:
- Open the data export or TCP export settings.
- Enable TCP/socket export.
- Set the port to
9055. - Keep the export format as plain text.
- Start reading tags.
Share the TCP Stream with Group Members
If a teammate will run Python from another laptop:
- On the Windows laptop, turn on Mobile Hotspot.
- Ask group members to connect to that hotspot.
- On the Windows laptop, run
ipconfigand find the hotspot IPv4 address. - On another laptop, you can also run
arp -aafter joining the hotspot to help identify the Windows host. - Use that IP address as the
--hostargument.
Record a Test Log
If Python runs on the same Windows laptop:
python ./reading_from_TCP.py --host 127.0.0.1 --output-dir logs/baseline --filename test.log
If Python runs on a teammate’s laptop connected through the Windows hotspot:
python ./reading_from_TCP.py --host 192.168.137.1 --output-dir logs/baseline --filename test.log
The script reads for 15 seconds by default. To change the duration:
python ./reading_from_TCP.py --host 127.0.0.1 --duration 20 --output-dir logs/baseline --filename test_20s.log
The terminal should print lines containing the tag EPC, timestamp, RSSI, and read count. The same text is saved to the log file.
2:20-2:55 PM - Distance Experiment
Question
How do RSSI and read count change as the tag moves farther from the reader?
Procedure
- Keep the reader fixed.
- Use the same three tags for every trial.
- Put the tags very close to the reader and record 15 seconds.
- Move the tags to about 25 cm and record 15 seconds.
- Move the tags to about 50 cm and record 15 seconds.
- Move the tags to about 100 cm and record 15 seconds.
- Keep the tag orientation as consistent as possible across trials.
Example commands:
python ./reading_from_TCP.py --host 127.0.0.1 --output-dir logs/distance --filename next_to.log
python ./reading_from_TCP.py --host 127.0.0.1 --output-dir logs/distance --filename 25cm.log
python ./reading_from_TCP.py --host 127.0.0.1 --output-dir logs/distance --filename 50cm.log
python ./reading_from_TCP.py --host 127.0.0.1 --output-dir logs/distance --filename 100cm.log
Replace the example EPCs below with your own three EPC values:
python ./plot_single_log.py \
  --epcs EPC_TAG_1 EPC_TAG_2 EPC_TAG_3 \
  --log-file logs/distance/25cm.log \
  --title "Distance: 25 cm"
python ./plot_multiple_logs.py \
  --epcs EPC_TAG_1 EPC_TAG_2 EPC_TAG_3 \
  --folder ./logs/distance \
  --title "Distance comparison"
If the plot window causes problems, add --noshow. The script still saves a PNG file.
Record:
| Distance | Log filename | Which tags were read? | RSSI trend | Read-count trend | Notes |
|---|---|---|---|---|---|
| Very close | next_to.log |
||||
| 25 cm | 25cm.log |
||||
| 50 cm | 50cm.log |
||||
| 100 cm | 100cm.log |
Questions:
- Which distance produced the strongest RSSI?
- Which distance produced the highest read count?
- Did all tags behave the same way?
- Did performance degrade gradually or suddenly?
2:55-3:25 PM - Orientation Experiment
Question
How does tag orientation change RFID read reliability?
Procedure
- Fix the reader location and choose a distance that worked reliably in the distance experiment.
- Place all three tags upright/vertical and record 15 seconds.
- Rotate the tags by 90 degrees so they are horizontal and record 15 seconds.
- Optionally test a 45-degree orientation if time allows.
- Use the same host, output folder, and EPC list workflow from the distance experiment.
Example commands:
python ./reading_from_TCP.py --host 127.0.0.1 --output-dir logs/orientation --filename vertical.log
python ./reading_from_TCP.py --host 127.0.0.1 --output-dir logs/orientation --filename horizontal.log
python ./reading_from_TCP.py --host 127.0.0.1 --output-dir logs/orientation --filename tilted_45deg.log
Plot the folder:
python ./plot_multiple_logs.py \
  --epcs EPC_TAG_1 EPC_TAG_2 EPC_TAG_3 \
  --folder ./logs/orientation \
  --title "Orientation comparison"
Record:
| Orientation | Log filename | RSSI trend | Read-count trend | Notes |
|---|---|---|---|---|
| Vertical | vertical.log |
|||
| Horizontal | horizontal.log |
|||
| 45 degrees, optional | tilted_45deg.log |
Questions:
- What did you find when rotating the tags by 90 degrees?
- Which orientation was most reliable?
- Which tag changed the most?
- Why might antenna/tag alignment matter?
3:25-3:55 PM - Blockage Experiment
Question
What happens when the line between the reader and tags is blocked by common objects?
Procedure
- Fix the reader location and tag distance.
- Record a no-blockage baseline.
- Block the line of sight with a hand and record 15 seconds.
- Block with a human body and record 15 seconds.
- Block with a laptop or another metal-rich object and record 15 seconds.
- Keep the tag locations fixed while only changing the blockage condition.
Example commands:
python ./reading_from_TCP.py --host 127.0.0.1 --output-dir logs/blockage --filename no_blockage.log
python ./reading_from_TCP.py --host 127.0.0.1 --output-dir logs/blockage --filename hand.log
python ./reading_from_TCP.py --host 127.0.0.1 --output-dir logs/blockage --filename body.log
python ./reading_from_TCP.py --host 127.0.0.1 --output-dir logs/blockage --filename laptop.log
Plot the folder:
python ./plot_multiple_logs.py \
  --epcs EPC_TAG_1 EPC_TAG_2 EPC_TAG_3 \
  --folder ./logs/blockage \
  --title "Blockage comparison"
Record:
| Condition | Prediction | Log filename | Observed effect | Notes |
|---|---|---|---|---|
| No blockage | no_blockage.log |
|||
| Hand | hand.log |
|||
| Body | body.log |
|||
| Laptop/metal | laptop.log |
Questions:
- Which blockage condition caused the largest RSSI drop?
- Which condition caused the largest read-count drop?
- Why are human bodies and metal objects challenging for UHF RFID?
- Was a low RSSI always the same as a low read count?
3:55-4:45 PM - Three-Point RFID Touch Sensor
Concept
A passive RFID tag can act like a crude touch point because a finger, hand, or object near the tag can change the tag’s read strength or read rate. The provided GUI compares live tag readings against a short calibration baseline.
The latest touch_detector_gui.py is intentionally a scaffold. It computes live metrics for each tag, but the actual touch decision is left for you to implement in:
LiveTagMetrics._student_touch_rule(...)
Your detector should use three cues:
- RSSI drop compared with calibration;
- read-rate drop compared with calibration;
- missing reads for a short time window.
Prepare the Touch Surface
- Tape three RFID tags to paper, cardboard, or another flat surface.
- Label them Point 1, Point 2, and Point 3.
- Keep the points separated enough that a finger can cover one point without covering the others.
- Record the EPC-to-point mapping.
| Touch point | EPC | Physical location | Notes |
|---|---|---|---|
| Point 1 | |||
| Point 2 | |||
| Point 3 |
Configure and Run the GUI
Open touch_detector_gui.py and edit the configuration block near the top:
HOST = "192.168.137.1"
PORT = 9055

SELECTED_EPCS = [
    "EPC_TAG_1",
    "EPC_TAG_2",
    "EPC_TAG_3",
]
Use HOST = "127.0.0.1" if the GUI runs on the same Windows laptop as Universal Reader Assistant. Use the Windows hotspot IP if the GUI runs on another laptop.
Run:
python ./touch_detector_gui.py
During the first 10 seconds, do not touch the tags. The GUI is calibrating each tag’s baseline RSSI and read rate.
Before you implement the rule, the GUI should run but should not reliably detect touches. The detector column may show CLEAR with a reason such as student rule not implemented. Use this first run to observe the baseline RSSI, baseline rate, current RSSI, current rate, RSSI drop, rate drop, and last-seen fields.
Implement _student_touch_rule
Open touch_detector_gui.py and find:
def _student_touch_rule(
    self,
    rssi_drop: float | None,
    rate_drop: float | None,
    no_read: bool,
    was_touched: bool,
) -> tuple[bool, str]:
This function must return:
return is_touched, reason
where is_touched is True when the tag should be marked as touched, and reason is a short message shown in the GUI.
Available inputs:
| Input | Meaning |
|---|---|
rssi_drop |
baseline RSSI - current RSSI, in dB. Larger positive values mean the signal became weaker. |
rate_drop |
Fractional read-rate loss from baseline. For example, 0.70 means the tag is being read 70% less often. |
no_read |
True when this tag has not appeared recently. |
was_touched |
True if this tag was marked touched during the previous GUI update. Use this for release/hysteresis logic. |
Suggested constants already defined near the top of the file:
RSSI_DROP_TOUCH_DB = 8.0
RSSI_DROP_RELEASE_DB = 3.0
RATE_DROP_TOUCH_FRACTION = 0.50
RATE_DROP_RELEASE_FRACTION = 0.30
Your first working version should handle these cases:
- If
no_readisTrue, usually return touched because the tag disappearing is a strong signal. - If
rssi_dropis larger thanRSSI_DROP_TOUCH_DB, return touched. - If
rate_dropis larger thanRATE_DROP_TOUCH_FRACTION, return touched. - If
was_touchedisTrue, do not immediately switch back to clear. Wait until the signal mostly recovers, for example usingRSSI_DROP_RELEASE_DBandRATE_DROP_RELEASE_FRACTION. - If neither RSSI nor read-rate evidence suggests a touch, return clear.
- Always handle
Nonevalues safely. For example,rssi_dropcan beNoneif there are no current RSSI samples.
After implementing the function, rerun:
python ./touch_detector_gui.py
Calibrate again with all tags untouched. Then touch or cover one point at a time and watch whether the GUI marks the correct tag as TOUCHED.
Touch Test Table
| Trial | Point touched | GUI result | Correct? | Notes |
|---|---|---|---|---|
| 1 | Point 1 | |||
| 2 | Point 1 | |||
| 3 | Point 2 | |||
| 4 | Point 2 | |||
| 5 | Point 3 | |||
| 6 | Point 3 |
Improve the Detector
After your first implementation works, make it more robust. If the detector is too sensitive or not sensitive enough, try tuning these constants in touch_detector_gui.py:
CALIBRATION_SECONDS = 10.0
WINDOW_SECONDS = 2.0
NO_READ_SECONDS = 1.0

RSSI_DROP_TOUCH_DB = 8.0
RSSI_DROP_RELEASE_DB = 3.0
RATE_DROP_TOUCH_FRACTION = 0.50
RATE_DROP_RELEASE_FRACTION = 0.30
Ideas for improving robustness:
- Tune the RSSI and read-rate thresholds for your own setup.
- Add better release logic so the detector does not flicker between
TOUCHEDandCLEAR. - Use per-tag thresholds instead of one global threshold.
-
Use per-tag noise-aware thresholds. For example, during calibration compute the median absolute deviation (MAD) of each tag’s RSSI and use:
threshold[tag] = max(8 dB, 3 * MAD[tag])Some tags naturally fluctuate more than others.
-
Use a confidence score instead of hard OR logic:
score = 0.55 * rssi_score + 0.35 * rate_score + 0.10 * missing_scoreThen display states such as
CLEAR,LIKELY TOUCHED,TOUCHED, orAMBIGUOUS. - Modify
LiveTagMetrics.finish_calibration()if you want to compute a better baseline. - Keep the main decision inside
_student_touch_rule()so your implementation is easy for the TA to inspect.
Questions:
- Which point was easiest to detect?
- Which point was hardest to detect?
- Did touching one point affect the readings from nearby tags?
- Which cue was most useful in your setup: RSSI drop, read-rate drop, or no-read?
- Which change improved the detector most?
4:45-5:00 PM - Checkoff and Submission
Show the TA:
- Universal Reader Assistant reading at least one tag.
- The EPC values for your three tags.
- One saved TCP log file.
- One distance comparison plot.
- One orientation or blockage comparison plot.
- Your completed
_student_touch_rule()implementation. - The touch detector GUI running with your three selected tags.
- Your shared slide deck link in the Google Sheet.
Your shared slide deck should include:
- Group members and hardware setup photo.
- EPC-to-tag mapping.
- Distance experiment plot and one-sentence observation.
- Orientation experiment plot and one-sentence observation.
- Blockage experiment plot and one-sentence observation.
- Touch sensor layout photo or sketch.
- Touch sensor result table.
- A short explanation of your
_student_touch_rule()logic. - One idea for making the RFID touch sensor more reliable.
Troubleshooting
| Problem | Likely cause | Fix |
|---|---|---|
| Universal Reader Assistant cannot find the reader | USB cable, driver, or wrong port | Try another data cable, reconnect the reader, restart Universal Reader Assistant, or ask a TA. |
| Tags show in Universal Reader Assistant but Python cannot connect | TCP export is not enabled or host/port is wrong | Confirm TCP export is enabled and use port 9055. Try 127.0.0.1 on the Windows laptop. |
| Teammate laptop cannot connect | Hotspot/network issue or firewall | Join the Windows hotspot, confirm the host IP with ipconfig or arp -a, and ask a TA if Windows Firewall blocks the port. |
| Log file is empty | Reader was not reading or TCP stream had no data | Start reading in Universal Reader Assistant before running the Python logger. |
| Plot script says no matching EPC readings were found | EPC list does not match the log | Copy EPCs exactly from the terminal output or Universal Reader Assistant. |
GUI says NO BASELINE |
Not enough reads during calibration | Move tags closer, improve tag orientation, or increase CALIBRATION_SECONDS. |
GUI always says CLEAR or student rule not implemented |
_student_touch_rule() has not been completed |
Implement the RSSI, read-rate, no-read, and release logic in touch_detector_gui.py. |
GUI always says TOUCHED |
Thresholds are too sensitive or baseline was bad | Recalibrate without touching the tags, increase thresholds, or improve tag placement. |
Core Takeaway
RFID can identify passive tags without line of sight, but reliable RFID systems depend strongly on distance, orientation, materials, antenna geometry, and software filtering. The same reader stream can support both object-identification experiments and simple sensing applications when the data is logged and analyzed carefully.